Creating High-Quality Videos with LTX-Video Models and Diffusers - Complete Guide from Installation to Video
>>>Skip to content
1. Create and Activate a Virtual Environment
3. Install additional packages (optional)
Next, create and activate the virtual environment.
Next, install the transformers library.
5. Installing the SentencePiece library
To prevent errors here, uninstall the current version of PyTorch and then reinstall it.
Drag down the screen to find Diffusers
After saving the file as example.py, move it to the folder where diffusers is installed.
*model_path = 'Location of your models directory'
Next, navigate to the location where models.py is located using the command prompt.
Thank you for your hard work studying. Thank you for reading.
LTX-Video model is an innovative DiT(Discrete Transformer)-based video generation model that provides the ability to generate high-quality videos in real time. The model can learn from various video datasets to generate realistic and diverse content. Key features include:
Key features
- Real-time generation: It can generate 24 FPS videos at 768x512 resolution faster than real time.
- Various generation modes: It supports text-to-video, image-to-video, and video-to-video conversion.
- High-quality output: It generates high-resolution videos, and can realistically express various scenes and actions.
Use cases
- Text-to-video: It generates videos based on text descriptions.
- Image-to-video: It takes images as input and generates videos.
- Video-to-video: It converts or extends existing videos to generate new videos.
Requirements
- Python 3.10.5 or later
- CUDA 12.2 or later
- PyTorch >= 2.1.2
The LTX-Video model can be used for a variety of video generation tasks and is a powerful tool for quickly generating high-quality video content. More information can be found [here](https://huggingface.co/Lightricks/LTX-Video).
: [Hugging Face](https://huggingface.co/Lightricks/LTX-Video)
: [GitHub](https://github.com/Lightricks/LTX-Video)
Related papers [2501.00103] LTX-Video: Realtime Video Latent Diffusion
Model licensing information▼
https://huggingface.co/Lightricks/LTX-Video/blob/main/ltx-video-2b-v0.9.5.license.txt
I will briefly explain Diffusers in order to explain how to generate videos by linking them with the LTX-Video Model.
Diffusers is a library for state-of-the-art diffusion models provided by Hugging Face. It can be used to generate images, videos, audio, and even 3D structures of molecules. Diffusers is a modular toolbox that supports a variety of functions, from simple inference solutions to training your own diffusion models.
Key Features
- State-of-the-art diffusion pipeline: Provides a state-of-the-art diffusion pipeline that can be inferred with just a few lines of code.
- Noise scheduler: Provides a noise scheduler that can be used interchangeably to balance generation speed and quality.
- Pretrained models: Provides pretrained models that can be used as building blocks and combined with the scheduler to create your own end-to-end diffusion system.
Use Cases
- Image generation: Generate images based on text descriptions.
- Video generation: Generate videos based on text descriptions.
- Audio generation: Generate audio based on text descriptions.
- 3D structure generation: Generate 3D structures of molecules.
The Diffusers library is licensed under the Apache License 2.0. This license gives you the freedom to use, copy, and distribute the software, subject to certain conditions. The main conditions are as follows:
Apache License 2.0 Main Conditions
Copyright Notice: You must include the original copyright and license notices in all copies of the software.
Change Notice: You must clearly mark any files that you modify as changed.
Patent License: You grant the right to enforce patents related to the software.
No Trademark Use: The license does not grant you any rights to use trademarks.
No Warranty: The software is provided "as is", without any express or implied warranties.
The Apache License 2.0 is a widely used license for open source software that provides many freedoms to users while protecting the rights of copyright holders. More information about the license for the Diffusers library can be found here.
Now, I will guide you through the installation process for Diffusers.
How to install Diffusers
1. Create and Activate a Virtual Environment
First, create and activate a virtual environment. Using a virtual environment can help prevent dependency conflicts between projects.
windows
python -m venv env .\env\Scripts\activate |
macOS/Linux
python -m venv env source env/bin/activate |
2. Install Diffusers
Install Diffusers while the virtual environment is active. I will guide you through how to install it with PyTorch.
Installing with PyTorch
pip install diffusers["torch"] |
3. Install additional packages (optional)
You can install additional packages to use with Diffusers. For example, to install the accelerate package, run the following command:
pip install accelerate |
4. Install from source
Create a diffusers folder at the root of your disk. Then type the following at a command prompt:
To install the latest development version, you can clone and install the source code from the GitHub repository.
git clone https://github.com/huggingface/diffusers.git cd diffusers pip install -e .[torch] |
Next, create and activate the virtual environment.
Windows
python -m venv env .\env\Scripts\activate |
macOS/Linux
python -m venv env source env/bin/activate |
Install required packages
pip install diffusers torch |
Next, install the transformers library.
pip install transformers |
5. Installing the SentencePiece library
With the virtual environment activated, install the SentencePiece library:
pip install sentencepiece |
To prevent errors here, uninstall the current version of PyTorch and then reinstall it.
Uninstall the current PyTorch version First, uninstall the currently installed PyTorch version:
pip uninstall torch |
Install a PyTorch version that supports CUDA Next, install a PyTorch version that supports CUDA. Depending on the CUDA version you are using, you need to choose the appropriate PyTorch version. For example: If you are using CUDA 11.8
pip install torch==2.3.0+cu118 torchvision torchaudio --extra-index-url https://download.pytorch.org/whl/cu118 |
To prevent any modules that may be incompatible with the NumPy version, we will also reinstall numPy.
pip uninstall numpy pip install numpy==1.21.6 |
Now that the Diffusers installation is complete, let's proceed with the LTX-Video Model installation.
Go to the LTX-Video huggingface site below:
https://huggingface.co/Lightricks/LTX-Video

▲LTX-Video site capture image
Drag down the screen to find Diffusers

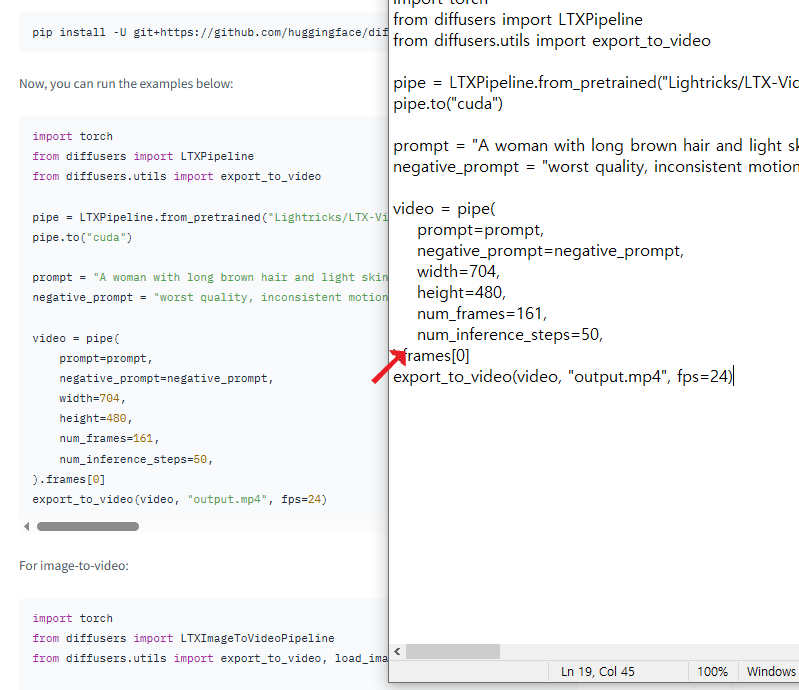
After saving the file as example.py, move it to the folder where diffusers is installed.

After pasting the source code into Notepad, name the file with the extension models.py and move it to the folder where diffusers is installed. *Caution* Do not move it to the models folder. Create a folder called models in the folder where diffusers is installed.

*model_path = 'Location of your models directory'
Next, navigate to the location where models.py is located using the command prompt.
One thing to note here is that your hard disk must have at least 200 GB of remaining space. Since models with huge capacities will be installed, we recommend that you increase the hard disk space before running it.
In the command prompt, navigate to the location where the models.py file is located and type models.py.
(env) C:\sd\diffusers\diffusers>py models.py |

Dozens of models of massive size begin to be installed.
Once the model installation is complete, running the example.py example will start creating a video using LTX-Video Models and Diffusers.

I thought everything was done, but an error occurred right before the video was created.
100%|███████████████████████████████████████████████████████████████████████████████| 50/50 [4:15:21<00:00, 306.43s/it] It is recommended to use `export_to_video` with `imageio` and `imageio-ffmpeg` as a backend. These libraries are not present in your environment. Attempting to use legacy OpenCV backend to export video. Support for the OpenCV backend will be deprecated in a future Diffusers version Traceback (most recent call last): File "C:\sd\diffusers\diffusers\example.py", line 19, in <module> export_to_video(video, "output.mp4", fps=24) File "C:\sd\diffusers\diffusers\src\diffusers\utils\export_utils.py", line 154, in export_to_video return _legacy_export_to_video(video_frames, output_video_path, fps) File "C:\sd\diffusers\diffusers\src\diffusers\utils\export_utils.py", line 121, in _legacy_export_to_video raise ImportError(BACKENDS_MAPPING["opencv"][1].format("export_to_video")) ImportError: export_to_video requires the OpenCV library but it was not found in your environment. You can install it with pip: `pip install opencv-python` |
This error occurs because the export_to_video function requires the OpenCV library, but the library is not installed in the current environment. OpenCV is a library widely used for video processing. Install the OpenCV library.
pip install opencv-python |
While we're at it, let's also install the imageio and imageio-ffmpeg libraries.
pip install imageio[ffmpeg] |

I think it's because my graphics card is not very powerful, but it takes a long time to generate a video.

I thought the generated video would be in the example.py file since we didn't do any special settings, and I was right. You can see the generated video in the diffusers folder.
Comments
Post a Comment